
Standalone IP cameras have come down in price quite remarkably over the past few years. It is now perfectly possible to get a camera for between £50.00 and £75.00, and this makes them attractive for anyone wanting to set up simple “home surveillance” systems. I bought one recently just to see what I could realistically do with such a beast. I chose the TP-Link TL-SC3130G,
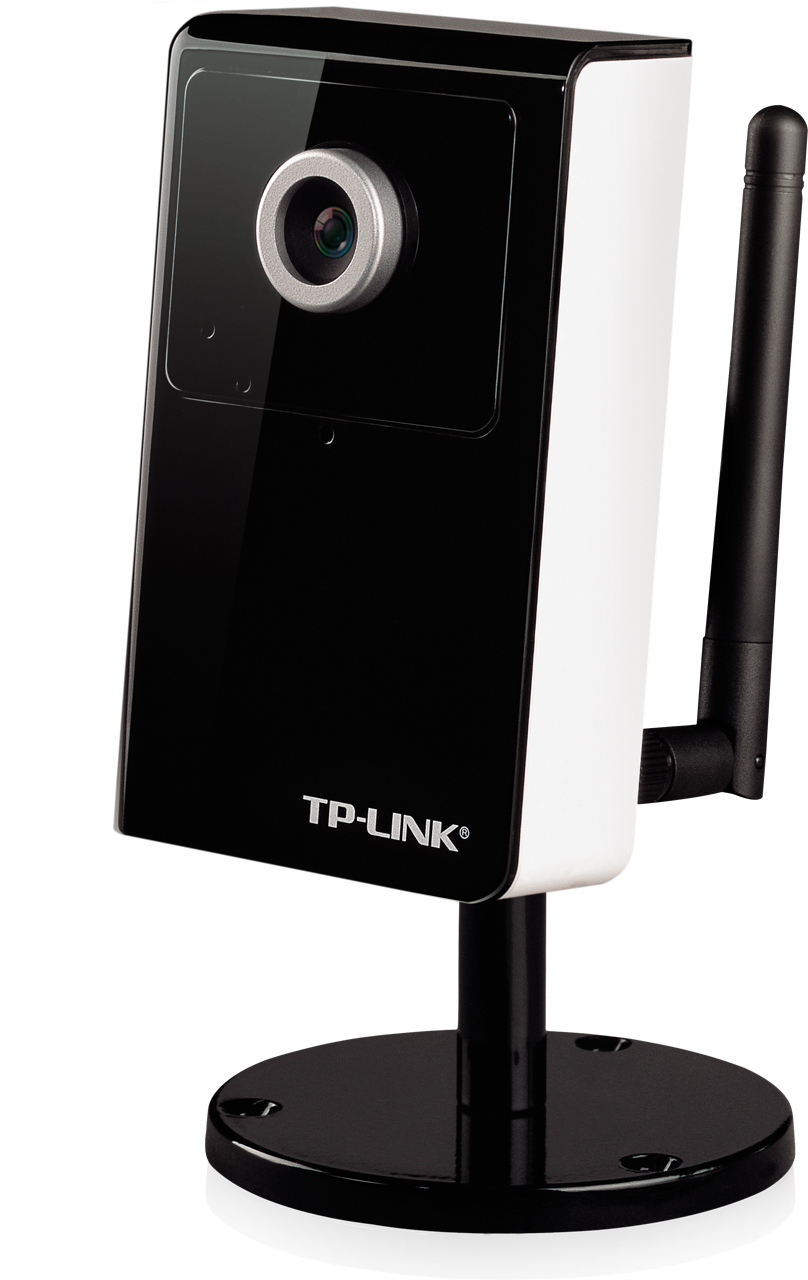
which goes for around £60.00. I bought mine from amazon. I chose this particular camera because, on paper, it looked to have a good specification at a keen price point. According to the TP Link website, the camera’s highlights include:
- 54Mbps wireless connectivity brings flexible placement
- Bi-directional audio allows users to listen and talk remotely
- Excellent low light sensitivity ensures good video quality even in the dawn
- MPEG-4/MJPEG dual streams for simultaneous remote recording and local surveillance
plus an impressive list of protocol capabilities all in a reasonably compact and attractive hardware package.
When the camera arrived I was pleased to find that the hardware was indeed quite solid and attractive. Such a shame I can’t say anything good about the software though.
As you would expect, I had to first configure the camera over a wired link. By default the camera comes up on 192.168.1.10. The login credentials are the usual “admin/admin” – which is the first thing you should change, but sadly I’ll bet that few people bother. The web interface presents the user with a set of configuration menus on the left of the screen and an image taken from the camera towards the centre of the screen. The software assumes that the user has IE and ActiveX running so for those of us with more sensible setups, some of the configuration and control options on the camera (such as snapshot, zoom and audio volume control) are unavailable. No matter, the important thing from my point of view, and the reason I bought this camera rather than its slightly cheaper brother, the SC3130, is the supposed wireless capability. At first sight, the camera and network configuration options look surprisingly comprehensive. In fact, I’d go so far as to say that the list of options available might confuse a user who had little networking experience. For example, besides the obvious options to set new static IP addressing or change to DHCP, you can change HTTP, RTP and RTSP ports, set up multicast streaming, change the multicast address, change the ports used for video and audio streaming, set viewer authentication, set the camera to use PPPoE and dynamic DNS and even send users an alert via email containing the new network settings (such as IP address) should these change. Of course, in order to do so the user must first configure email on the camera. Altogether an impressive looking range of capabilities. Again, such a shame they don’t all work.
Annoyingly, the web interface sometimes simply refused to accept changes or the system reset the changes after reboot, I first noticed this when changing the camera’s clock setting to sync with the time on my PC. It simply refused. NTP worked eventually, but it tended to stop working for no apparent reason. But by far the worst fault was in the WiFi stack. WiFi configuration options were all accepted and it was soon possible to connect wirelessly both to configure the camera and to view either a video stream or a still image. However, as soon as the wired connection was removed, both interfaces went down. Nor was it possible to connect wirelessly if the camera was booted without a cable inserted. Now it is pretty pointless to have a WiFi camera that insists on having a wired connection present as well and I couldn’t believe that no-one had tested this so I assumed that there was some way to get the thing working. Besides I hate being beaten. So I spent what was, on reflection, a disproportionately silly amount of time playing with various configuration options (DHCP vs static addressing, various combinations of UPnP and no UPnP (which involved me changing my router configs as well), changing various network port numbers, all to no avail. I searched the manufacturer’s website in case there was a new firmware image I could try, but that was a waste of time because the image on the website (1.6.17 dated 29 October 2010) was older than the firmware on the camera (1.6.18 dated 17 March 2011).
After trying umpteen variations of settings, at one point the camera froze completely and refused to boot. I had to resort to a hardware reset to get the thing back up again. Here it got weirder still. The camera came back up on 192.168.1.97 and not the default 192.168.1.10 (I found it with a sniffer). God help the average punter trying to get this thing to work.
I sent it back, and amazon refunded my money. Do yourself a favour. Don’t even think about buying one.
4 comments
Skip to comment form
Hi ,
This is Luke from TP-LINK support team. I have ran across this article through google and I apologize if you haven’t had a good experience with TP-LINK products.
Although you have already return this camera I still want to share something here so that it may helpful to others who have also ran across this article.
1. For the strange IP thing. In firmware 1.6.18, the default setting is to get IP through DHCP. If there is no DHCP server available it will auto assign an IP address which is 192.168.1.X by itself. I suppose you just connect the camera directly to your computer after reset so it assign an IP 192.168.1.97 after hard reset.
2. Currently it seems that the compatibility with non-IE browsers such as Chrome, Firefox and Safari it no so good. Some features such as snapshot, zoom, audio volume control and motion detection are missing on these browsers because they don’t use ActiveX. We know it is not convenient as more and more users are using these browsers so we are considering other ways to make these features available on these browsers.
3. For the problem you reported I haven’t encounter them before but I will take it seriously and will try to reproduce it. If you can provide me more details via email I will be grateful.
Once again I apologize for any inconvenience caused and hope you don’t lose faith on TP-LINK products. We are always working on to make our products better.
Best Regards
//Luke
–EOF–
Author
Hi Luke
Thanks for the comment. Frankly I’m quite impressed that someone from support at TP-Link should have even found this post, let alone bothered to comment. Kudos to you for that. Unfortunately, as I said in the post, it is a shame that the software on your product is so flakey and unreliable because the hardware was actually quite reasonable.
The default IP address first assigned to the camera when I unpacked it was as stated in the documentation – i.e. 192.168.1.10. It did not pick up an address from my DHCP server. Indeed, it could not do so because my DHCP server only assigns addresses if it knows the MAC address of the device requesting it. Further, the address pool runs from .64 to .95 so the 192.168.1.97 address could not possibly have come from my DHCP server after the hard reset (not in the range assigned and the MAC address was not in the allowed list). I suggest you check the networking code on the camera very thoroughly.
I’m glad to hear that you are considering alternatives to Active X. Many people don’t like that technology at all and refuse to use it.
Reproducing the network problem should be easy. I managed it dozens of times before I gave up. Simply assign any available address (other than 192.168.1.10 of course) to the wifi interface and check that both addresses are up. Now unplug the wired interface and watch both interfaces go down. Reboot the camera without the wired connection. No network address available. Now re-insert the CAT5 cable and try again. Both interfaces come up. Try doing the same with a DHCP address assigned to either or both wired and wifi interfaces and you get the same symptoms.
Good luck in fixing it.
Mick
I am having a similar issue, same hardware, same problem, however i seem to be unable to even get a trace of the cam’s IP on any given range i’d normally use, including the 192.168.1.X range. i really wonder if the reset button is just there as some sort of decoration as is does not seem to do anything, i’ve tried resetting it a few dozen times, tried it on severals ipranges, several different pc’s, for future use: build in a usb controller to configure it all…
I have to say, I have had this camera since 2011 and it works fine. Except for the moronic dependance on
a blighted protocol like “Active X”. Who in the engineering and design team decided to lock in a hardware
product with a retarded Windows only software plugin? The Microsoftisation of hardware is a bad move.
TP-Link should go back and produce some soft/firmware for this camera that is Open and flexible enough
for anyone to use regsrdless of whether it is a PC or a Mac. I had to install a VM just to run Evilware to
configure the motion detector. What a terrible shortcoming – had I known this prior to purchasing the camera,
I would’ve got something else. But yes, the camera works fine so long as you don’t need to configure it much.
Come on TP-Link – it’s a great piece of hardware, crippled by crapware like Active X, which sounds more
like a hair treatment. Please fix this terrible disaster of software lockin.