
Update note – added on 6 June 2008. Since writing this post, both mencoder and ffmpeg have been updated so that the settings described below will no longer work. In particular, the “aac” audio codec has changed and the “i_certify….” option to the lavfopts format is no longer supported (or necessary).
Use these settings instead.
video:
“-ovc lavc -lavcopts threads=2:vglobal=1:vcodec=mpeg4:
mbd=2:trell:vbitrate=$VIDBR -vf scale=$WIDTH:$HEIGHT,
harddup -of lavf -lavfopts format= psp”
and audio:
“-oac lavc -lavcopts threads=2:aglobal=1:acodec=libfaac -af lavcresample=24000”
End of update note.
Note – the screenshots given here may not be completely legible in your browser. Click on the image for a larger view.
I wrote this after discovering just how how flexible and useful the excellent k9copy program really is. This program allows you to select tracks, preview, shrink and copy whole or part DVDs, save to ISO files for later burning and, best of all for me, transcode to a wide variety of formats using mencoder. Truly a wonderful tool. All credit to its authors.
This page is dedicated to ripping and encoding to PSP format – for reasons why, see my earlier postings on the topic.
k9copy is probably available in your default distro install if you use a KDE desktop (such as will be the case in OpenSUSE or Kubuntu for example). If you use a Gnome based distro, such as Ubuntu, then you may have to install it from the appropriate repository. You will, of course, also need mencode/mplayer and the libdvdcss library if you wish to rip and encode encrypted DVDs. (But note that doing so may not be legal in your locale – you need to check.)
k9copy is probably most widely used to copy and shrink DVDs from around 9 Gig to a more useable 5 Gig. But it also offers the possiblity of ripping and encoding to a variety of “MPEG 4” formats. It comes by default with a preset list of video and audio codec options such as MSMPEG-4, WMV7 and RealVideo etc. But the program also allows you to create and add your own codec options. The instructions below add a “video codec” called “PSP” and an “audio codec” called “PSP AAC”. These options are passed to mencoder by k9copy after the ripping process. This allows the user to select desired tracks from a DVD, preview those tracks and then rip and encode to a format usable on a Sony PSP.
Firstly, open k9copy and select “settings -> configure k9copy”. You will be presented with the options to edit/amend the Devices (optical drives) on your system, some DVD backup options (such as where to store .iso files, whether to use k3b for burning etc. along with mencoder, mpeg4 and preview options. The options we care about here are “mencoder” and “MPEG4”.
Part 1 – adding the PSP Video Codec
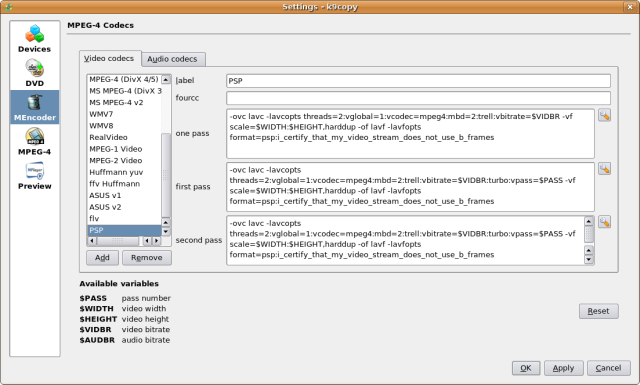
Click on the mencoder option in the left hand task bar and you will be presented with a screen with tabbed entries for “video codecs” and “audio codecs”. The video codec tab should be presented as the default start option. You will note that there are already a series of pre-set encoding options. Select “Add” to add your new “PSP” encoding option as in the screenshot below:
Screenshot 1 – adding the PSP video codec options
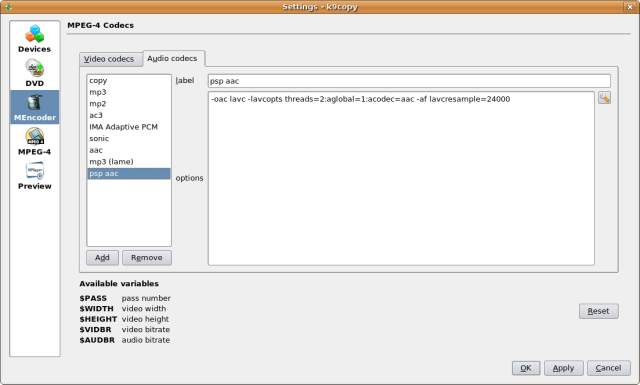
Click “apply” and now select the “audio codecs” tab and add the “PSP aac” encoding option as in screenshot 2 below.
Screenshot 2 – adding the PSP audio codec options
Again click “apply” to save the additions.
For clarity, the entries I have made for the video and audio codecs are:
video:
“-ovc lavc -lavcopts threads=2:vglobal=1:vcodec=mpeg4:
mbd=2:trell:vbitrate=$VIDBR -vf scale=$WIDTH:$HEIGHT,
harddup -of lavf -lavfopts format= psp:i_certify_that_my_video_stream_does_not_use_b_frames”
and audio:
“-oac lavc -lavcopts threads=2:aglobal=1:acodec=aac -af lavcresample=24000”
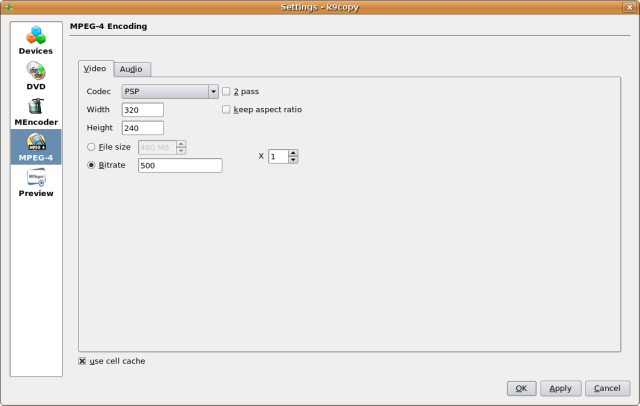
Now select the MPEG-4 option in the left task bar and you will be presented with a screen that allows you to set some defaults which will be applied each time you select MPEG4 encoding in future. These options include width:height of video, video and audio bitrates and whether to use one or two pass encoding for example. My selections are shown in two screenshots below – YMMV – for example you may wish to vary bitrates (though bear in mind that increasing the bitrates will result in longer encoding times and larger file sizes). The selections given work well on my PSP.
Screenshot 3 – Select video codec defaults
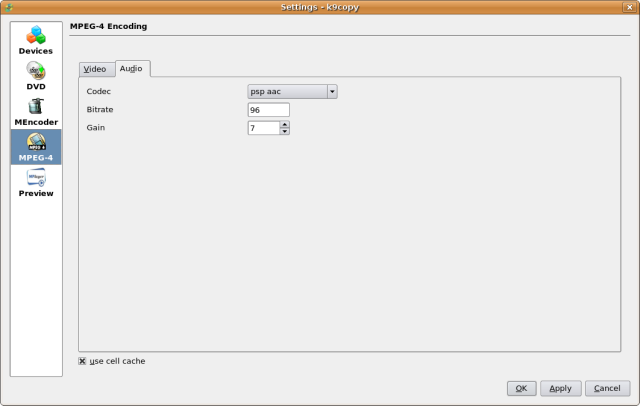
Screenshot 4 – Select audio codec defaults
You may also wish to play with the “preview” options before saving and exiting the setup. I find that Mplayer works well for me. When you are satisfied that you have everything the way you want it, select “OK” to save and go back to the main k9copy screen.
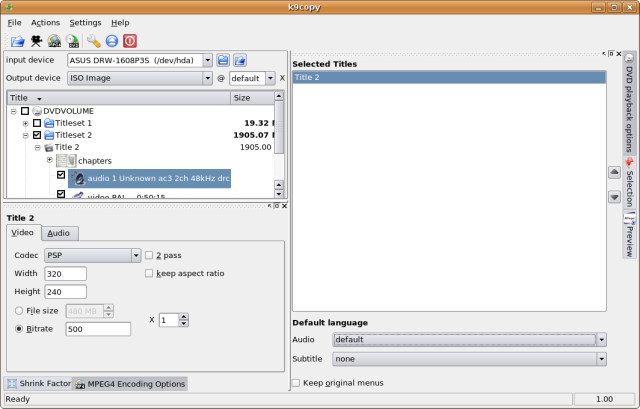
Now to try the ripping. Insert a DVD of your choice and select “file -> open” or click on the file/folder icon on the top bar menu. Assuming that you have selected the correct input device, you should be presented with a directory listing of the DVD in the left hand pane of the k9copy screen – see screenshot 5 below. You can now select the title(s) of your choice before ripping. It is worth checking your selection by previewing before you start to rip. Note that if you cannot see the MPEG4 options pane on the bottom left, you will need to click the “mpeg4 encoding options” button at the bottom of the screen. Check that the encoding options are the ones you want to use – i.e. your new PSP and PSP aac options before you start to rip.
Screenshot 5 – Select titles and audio tracks for encoding
When you are satisfied that you have the selection you want and the correct encoding options, select “actions -> create MPEG4” and choose a directory and filename for your new file. Note that the file extension must be .mp4 and not the default .avi if you are going to play this on your PSP so uncheck the “automatically select filename extension” box.
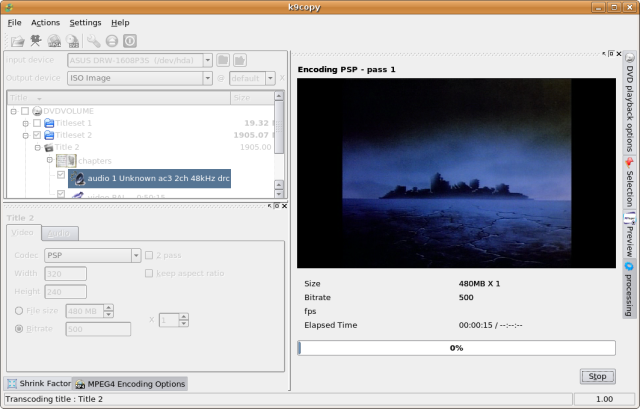
The screenshot below shows ripping in action. Note that the preview pane on the right will only show periodic snapshots of the video in progress – and you won’t get any audio.
Screenshot 6 – ripping and coding in action.
Enjoy – and thank the developers of such excellent software as k9copy, mencoder, ffmpeg and all other free software that you do not need to be bound to proprietary offerings alone.