
There is usually more than one way to solve a problem.
Back in October last year I wrote about using OpenVPN to bypass NAT firewalls when access to the firewall configuration was not available. I have also written about using ssh to tunnel out to a tor proxy. What I haven’t previously commented on is the ability to use ssh to set up reverse tunnels. By this I mean the capability to set up an outbound connection from one machine to a remote machine which can then be used as a tunnel back from the remote machine to the original.
You might ask why on earth anyone would want to do that. In fact this is a very useful trick. If we think back to the problem outlined in my october post, we were faced with the requirement to connect from a client machine on one network to a remote host on another network which was behind two NAT firewalls. The scenario was as below:
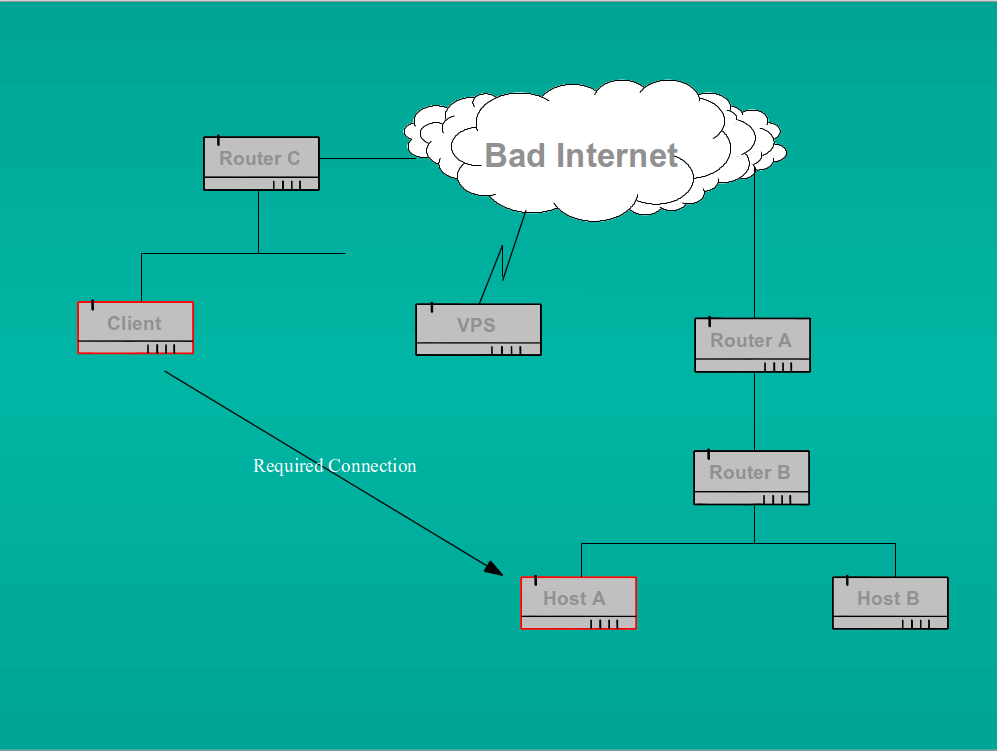
As I said in my previous post, ordinarily all we would have to do is run an SSH daemon (or indeed openVPN) on Host A and set up port forwarding rules on routers A and B to forward the connection to that host. But in the case we were considering, the owner of Host A was not able to set up the requisite port forwarding rules on the outermost router (because he didn’t own it). Indeed, this scenario is quite common in cases such as mobile data connections where the client device (say your smart phone or tablet) is given an RFC 1918 reserved address by the telco and is firewalled (often transparently) from the real internet by their NAT proxy.
We previously tackled this problem by setting up an intermediary openVPN server on a cheap VPS and using that as a relay between the two devices. However, ssh allows us to set up a reverse tunnel directly to the machine marked as “client” from the machine marked as “Host A” in the diagram above. We could, of course, also set up the tunnel to the VPS as an intermediate if we so desired. This might be necessary in cases where we don’t have access to router C for example and cannot configure inbound port forwarding there either.
Again, here’s how to accomplish what we want, this time using ssh.
On “client” (or the intermediary VPS) ensure that we have an unprivileged user such as “nobody” who has no login shell but does have a valid password. I set the shell on all unused accounts to /bin/false anyway, but you may choose otherwise. The sshd daemon itself uses /usr/sbin/nologin. The nobody account does not need a shell because we are only using it to set up the tunnel, not to actually login to the remote machine. Of course the “client” machine must have an ssh daemon listening on a port reachable by “Host A” or the initial tunnel connection will fail.
Host A must also have an ssh daemon listening in order to accept the back connection. Note that this latter daemon must be listening on “localhost” as well as the machine’s external IP address. This can most easily be accomplished by setting “ListenAddress 0.0.0.0” (rather than say, “ListenAddress 192.168.3.12”) in Host A’s /etc/ssh/sshd_config file. Localhost is necessary because that is the address on which Host A will see the incoming connection over the tunnel when it is established
Now on “Host A” open the tunnel to “client” thus:
ssh -N -f -R 2020:localhost:222 nobody@client
Here -N means no command at the remote end, i.e we are simply tunnelling; -f means background the process; -R means remote (or reverse); then listen on port 2020 on localhost on the client and connect back to port 222 on Host A). Note that nowhere in this command do we specify the ssh port used by the daemon on “client”. That is taken care of by default by ssh itself (ssh will assume port 22 unless we have changed that behaviour by modifying the port for “client” in /etc/ssh/ssh_config or a local .ssh configuration). Alternatively we could add the -p switch, followed by the requisite port number, to the above command line. Port 222 is the port on which the ssh daemon on Host A listens. Port 2020 can actually be any port which is currently unused on the “client” machine. Pick a port above 1024 to avoid the need for root privileges.
On running the command above we should be prompted for “nobody’s” password on the machine “client”. After supplying the password we will be returned to the command line on Host A. Now we can check that we have actually opened a connection by running netstat where we should see an established connection to ssh on the remote machine.
On the remote machine called “client”, we should similarly see the established ssh connection from Host A, but we should also be able to see a new ssh process listening on port 2020 on localhost. It is this process listening on port 2020 that allows us to connect back to Host A.
Now that we have an open tunnel, we can connect from “client” to “Host A” thus:
ssh -p 2020 localhost
This will default to the user we are currently logged in as on “client” and we will be prompted for the password for that userid “@localhost” (actually, the password for that user on Host A). Of course, if we wish to specify a different user we could add the “-l userid” switch to the ssh command line. If the password is accepted we will now be logged in to “Host A” from “client” and we have completely bypassed the NAT firewalls.
I strongly recommend that you do not attempt to use this mechanism (or openVPN) to circumvent a corporate security policy unless you wish to jeopardise your career.