In my 2017 article on using OpenVPN on a SOHO router I said: “In testing, I’ve found that using a standard OpenVPN setup (using UDP as the transport) has only a negligible impact on my network usage – certainly much less than using Tor.”
That was true back then but is unfortunately not so true now.
In 2017 my connection to the outside world was over a standard ADSL line. At its best, I saw around 11 – 12 Mbit/s. Using OpenVPN on my new Asus router I saw this drop to about 10 Mbit/s. I found that acceptable and assumed that it was largely caused by the overhead of encapsulation of TCP within UDP over the tunnel.
Not so.
My small corner of the rural English landscape has recently been provided with fast FTTC connectivity by BT Openreach. This meant that I could get a new fast fibre connection should I so wish. I did so wish, and at the end of my contract with my last ISP I switched to a new provider. I now have a VDSL connection giving me a 30 Mbit/s IP connection to the outside world. Plenty fast enough for our use case (though I can apparently get 60 Mbit/s should I so wish). However, my OpenVPN connection stayed stubbornly at the 10 Mbit/s mark. No way was that acceptable. In testing I switched the client connection endpoint away from my router and back to my i7 desktop. The tunnel speed went up to a shade under 30 Mbit/s. Conclusion? The overhead was /not/ caused by protocol encapsulation, but rather by the encryption load, and my SOHO router was simply not powerful enough to give me a decent fast tunnel. So I needed a new, beefier, router. I considered re-purposing an old Intel i5 box I had lying around unused, but on careful reflection I decided that that would be way too much of a power hog (and a bit on the large side) when all I really needed was something about the size and power consumption of my existing routers. But before selecting a hardware platform I looked for a likely OS. There are plenty of options around, varying from the fairly router specific OpenWRT/LEDE or DD-WRT firmware binaries, through to firewall platforms such as Endian, Smoothwall, IPFire, IPCop, pfSense or OPNsense.
At varying times in the past I have used OpenWRT, IPCop and IPFire with at best, mixed success. I decided fairly early on to discount the router firmware approach because that would mean simply re-flashing a SOHO router which would probably end up just as under powered as my existing setup. Besides I really wanted to try a new firewall with application layer capabilities to supplement my existing NAT based devices. Smoothwall, IPCop, IPFire and Endian are all based on hardened Linux distributions and whilst Endian looks particularly interesting (and I may well play with it later) I fancied a change to a BSD based product. I’m a big Linux fan, but I recognise the dangers of a monoculture in any environment. In a security setup a monoculture can be fatal. So I downloaded copies of both pfSense and OPNsense to play with.
As an aside, I should note that there appears to be a rather sad history of “bad blood” between the developers of pfSense and OPNsense. This can sometimes happen when software forks, but the animosity between these two camps seems to have been particularly nasty. I won’t point to the links here, but any search for “pfsense v opnsense” will lead you to some pretty awful places, including a spoof OPNsense website which ridiculed the new product.
OPNsense is a fork of pfSense, which is itself originally a fork of the m0n0wall embedded firmware firewall. The original fork of pfSense took place in 2004 with the first public version appearing in 2006. The fork of OPNsense from pfSense took place in January 2015 and when the original m0n0wal project closed in February 2015 it’s creator and developer recommended all users move to OPNSense. So pfSense has been in existence, and steady development for over 13 years, whilst OPNSense is a relative newcomer.
Politics of open source project forks aside, I was really only interested in the software itself. In my case, so long as the software meets my needs (in this case solid ability to handle multiple OpenVPN client configurations) what I care most about is usability, documentation, stability, longevity, active development and support (so no orphaned projects) and, preferably, an active community. Both products seem to meet most of these criteria, though I confess that I prefer the stability of pfSense over the (rather too) frequent updates to OPNsense. In my view, there is little to choose between the two products in terms of core functionality. The GUI’s are different, but preference there is largely a matter of personal taste, But crucially, for me, I found the pfSense documentation much better than that for OPNsense. I also found a much wider set of supplementary documentation on-line created by users of pfSense than exists for OPNsense. Indeed, when researching “openVPN on OPNsense” for example, I found many apparently confused users (even on OPNsense own forums) bemoaning the lack of decent documentation on how to set up openVPN clients. Documentation for both products leans heavily towards the creation of OpenVPN servers rather than clients, and neither is particularly good at explaining how to use pre-existing CAs, certificates and keys for either server or client end, but eventually I found it fairly straightforward to set up on pfsense and after now having it running successfully for a while I am happy to stick with that product.
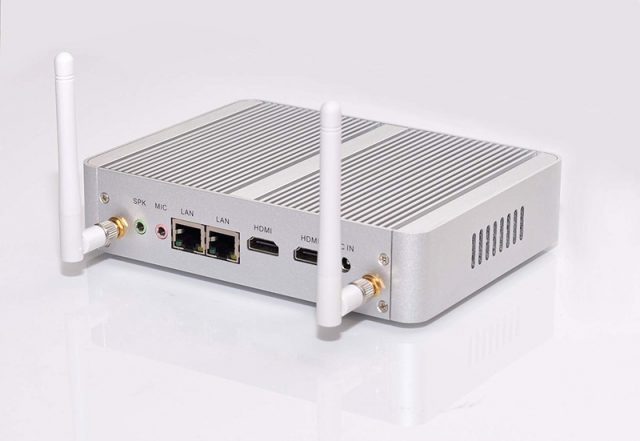
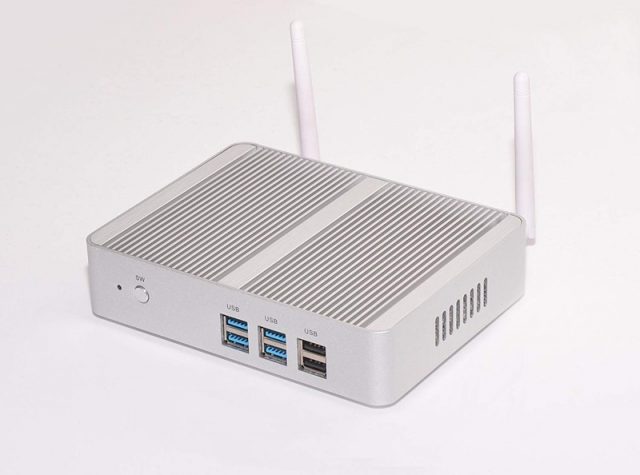
Having chosen my preferred product I had to purchase appropriate hardware on which to run it. I eventually settled on a Braswell Celeron Dual Core Mini PC.
As you can see from the pictures, this device has dual (Gigabit) ethernet ports, twin HDMI ports, WiFi (which I don’t actually use in my configuration) and six USB ports (USB 2.0 and USB 3.0), also unused. Internally it has a dual core Intel Celeron N3050 CPU (which crucially supports AES-NI for hardware crypto acceleration), 4 GB of DDR3 RAM and a 64 Gig SSD, all housed in a fanless aluminium case measuring not much larger than a typical external hard disk drive. Very neat, and in testing it rarely runs hotter than around 32 degrees centigrade.
So: what does my configuration look like?
Initial configuration is fairly straightforward and takes place during the installation and consists of assigning the WAN and LAN interfaces and setting the IP addresses. When this is concluded, additional general configuration is handled through the “setup wizard” available from the web based GUI which appears on the LAN port at the address you have assigned. This early configuration includes: naming the firewall and local domain; setting the DNS and time servers; and some configuration of the GUI itself. In my case I have local DNS forwarders on both my inner and outer local nets so I pointed psSense to my outer local forwarder (which. in turn, forwards queries to my external unbound resolvers). Most users will probably configure the DNS address to point to their ISP’s server(s). At this point it is a good idea to change the default admin password and then reboot before further configuration.
One point worth noting here is whether to set the pfSense box as a DNS forwarder, or resolver. In most configurations you will wish to simply forward requests to an external forwarder or resolver (as do I). Internally pfSense uses DNSmasq as a forwarder and unbound as a caching resolver so you could use the new firewall itself to resolve addresses. Forwarding is simpler.
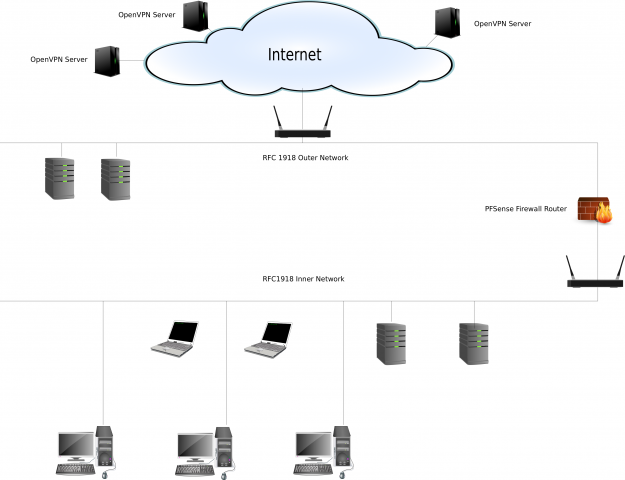
I did all the initial configuration off-line so as not to interrupt my existing network setup. But once I was happy with the new pfSense box I then had to simply amend the configuration of my existing internal router so that it’s RFC1918 WAN address matched the LAN address set on the new firewall (.1 at one end and .254 at the other). I had configured the WAN address of the pfSense box to match my existing external router setup so that insertion of the new box between the two routers caused minimum disruption. The new network looks something like this: (click the image for a larger view).
At this stage, the pfSense box is simply acting as a new NAT firewall and router. Testing from various points on the internal net showed that traffic flowed as I expected.
Now for the OpenVPN client configuration.
This assumes that we are using TLS/SSL with our own pre-configured CA, certificates and keys. Pfsense allows you to set up your own OpenVPN server and certificates if you wish. I chose not to do that because I am re-using an existing setup. You could also use the simpler pre-shared key setup (if this makes you feel safe).
These are the steps I followed:
1. Goto System -> Cert Manager – -> CA
Add the new CA.
Give it a descriptive name (such as “My Certificate Authority”).
Import an existing Authority.
Paste in your X509 Certificate and (optional but recommended) paste in your private key for that certificate).
Save.
2. Go to System -> cert manager -> certificates
(Note that there will already be a self signed cert for the pfsense webconfiguration GUI).
Add a new certificate.
Again give it a descriptive name (such as “My Openvpn Certificate”).
Import an existing certificate.
Paste in your X509 Certificate and private key.
Save.
3. Go to VPN -> Openvpn -> clients
Add a new client.
In the general Information Section:
Ensure the server mode is correct for your setup (we are using Peer to Peer TLS/SSL).
Check that the protocol and device mode are correct for your setup and that the interface is set to WAN.
Add the host server name or IP address for the remote end of the tunnel.
Give the connection a meaningful name (e.g. “hostname” in Paris).
If you use authentication, add the details.
In the Cryptographic settings section:
Ensure “use a TLS key” is checked.
But uncheck “automatically generate a TLS key” (because we have our own already).
Now paste in the TLS key and ensure that “TLS key usage mode” matches your use case (TLS Authentication or TLS Encryption and Authentication).
Select your previously created CA certificate from the “Peer Certificate Authority” drop down box together with any relevant revocation list.
Select your client Certificate (created at step 2 above) from the drop down box.
Select the encryption algorithm you use.
If you allow encryption algorithm negotiation at the server, then check the “Negotiable Cryptographic Parameter” box and select the algorithm(s) you want to use.
Select the “Auth digest algorithm” in use (I recommend a minimum of SHA256 – personally I use SHA512, but this must match the server end).
If your hardware supports it (AES-NI for example) then select “Hardware Crypto”.
In the Tunnel Settings section:
Leave everything at the default (because our servers set the Tunnel addresses) but ensure that the compression settings here match the remote server. Personally I disable compression (see OpenVPN documentation for some reasons) so I set this to “comp-lzo no” at both ends of the tunnel.
Finally, in the Advanced Configuration section:
Paste in any additional configuration commands that you have at the server end which have not been covered above.
I use:
remote-cert-tls server;
key-direction 1;
persist-key;
persist-tun
and select IPV4 only for the gateway connection (unless you actually use IPV6) and also select an optional log verbosity level. You may choose a high level whilst you are testing and change it later when all is working satisfactorily.
Save.
4. Repeat 3 above to create clients for all other servers (or VPN services) you may have.
Note that if you have multiple client configurations (as I do) then you should ensure that only one client at a time is enabled. You can selectively enable and disable clients by editing the configuration at VPN -> Openvpn -> clients for later usage.
5. Go To Interfaces -> Assignments -> Interface Assignment
Select an interface to assign to one of the clients created at 3 or 4 above from the drop down boxes.
Enable the interface by checking the box and give the interface a meaningful name (such as “tunnel to Paris”). (“We’ll always have Paris….”).
Leave everything else as the default and save.
Now allow access to the tunnel(s) through the interface(s):
6. Go to Firewall -> NAT -> Outbound
Check the radio button marked “select Manual Outbound NAT rule”. All the Firewall rules on the WAN interface which were created automatically as a result of your initial general setup will be shown. The source addresses for these rules will be the local loopback and the LAN IP address you set.
Add a new rule to the bottom of the list.
In the “Advanced Outbound NAT entry” section:
Change the address family to IPV4 only (if appropriate).
Give the source as the LAN network address of the pfsense F/W.
leave other entries as the default.
Save.
7. Go to Firewall -> Rules -> LAN
Disable the IPV6 rule (if appropriate to your use case)
8. Go to Firewall -> Rules – OpenVPN
Add a new rule to Pass IPV4 through the interface called OpenVPN. Give the rule a meaningful description (such as “allow traffic through the tunnel”
9. Now finally go to Status -> OpenVPN
The (single) OpenVPN client you have enabled from 3 above should be shown as running. You can stop or restart the service from this page.
10. Now check that traffic is actually going over the tunnel by checking your public IP address in a web browser (I use “check2ip.com” amongst others).
If all is working as you expect and you have multiple VPN endpoints, try disabling the tunnel you are using (from “VPN -> OpenVPN -> Clients, Edit Client”) and selectively enabling others. Check the status of each selected tunnel in “Status -> OpenVPN” and reload as necessary.
In my case, with the hardware I have chosen, and the configuration given above, I now get near native speed over any of my VPN tunnels. It will be interesting to see what I get should I move to even faster broadband in future.
Enjoy.


